Pick Track
Program Flow Overview
A background process PIQR (Pick Queue Runner), creates PIKT (Pick Track) records from invoices sent to the queue by parts salespeople. A picker enters their number at a terminal in the warehouse, and a printer prints pick tickets for them. The print time is recorded. After picking or looking for the parts, the picker enters the picked or looked information. The finish time is recorded. Managers track picking information in program PIKM (Pick Manager). Salespeople track picking information in program PIKT. From their screen, they can create POs or SORs for parts not in stock.Setting up Pick Track
 Enter PIKM at the Function Code prompt.
From the PIKM menu, press F11 (Utilities).
Enter PIKM at the Function Code prompt.
From the PIKM menu, press F11 (Utilities).
Setting up Pick Queue
From the Setups menu, highlight SET PICK QUE TO PULL FROM and press [ENTER].
If you want the salespeople to type P1 to send to Pick Track, then choose PICK-QUE1.
Important: Make sure the pick queue chosen for Pick Track is logged OFF in ADP (PIK).
Setting up Options
From the Setups menu, highlight OPTIONS and press [ENTER].
PO Userid is what you would enter in ADP functions CPO or DPO. This allows Pick Track to interface with POs.
Setting up Pickers
From the Setups menu, highlight PICKERS and press [ENTER].
X Picking
If a picker posts a Look to a part, it is re-queued, and the next designated X picker that puts in his number to print pick tickets, will get a re-print of that ticket. In other words, if the part has a bin location and shows any O.H., then it will be checked twice.The simplest setup is to make all pickers X pickers.
Starting Pick Queue Runner
From the main PIKM screen, press F12 to start the background routine PIQR. PIQR is the function that takes invoices sent to P1 (or other pick queue), and sets them up and queues them for Pick Track.Starting Auto Print
Optionally, you can press [S] from the PIKM screen to start the Auto Print function. This causes invoices to automatically print when pick tickets are completely processed. In the B/L field of the invoice salespeople enter a letter corresponding to the invoice printer number to auto-print to, e.g. A to print to invoice printer 1, or B for printer 2.Printing Pick Tickets
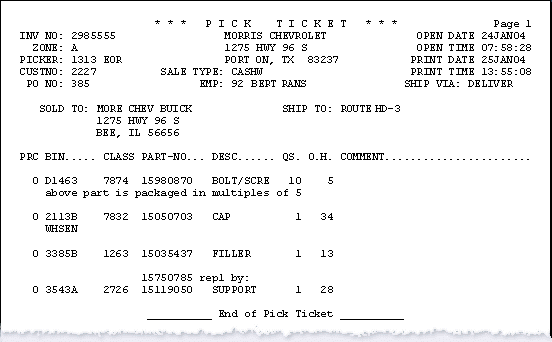
 Enter function PIKR. Select the zone(s) to print from this location and press F3.
At this time, zones are hard-coded and can be customized for bin ranges, RO-only, will-call, etc.
Select a printer to print pick tickets to.
 Enter picker number to print pick tickets.
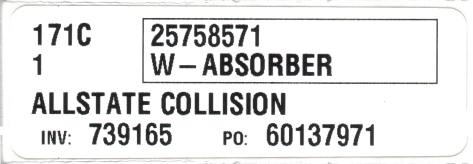 ...or labels.
 For each line, enter the quantity pulled, or L (Look) if it was not found.
The [ENTER] key and F5 provide shortcuts here.
How to go fast:
Mark any Looks, then press F5, F3 to quickly mark the pulls.
PIKT - The Counterman Screens
 This is a general search screen, but the most useful function of it is to simply enter the employee# and press F9. This causes several features in the following screen to become functional.
Several things can display on the status line:
|
PicS (pick ticket status) can be:
|
InvS (invoice status) can be:
|
These 2 screens auto-refresh every 40 seconds.
 Press F1 to see a screen of all possible process codes and examples.
PIKT Detail Screen
This is the action screen. Lines with dashed lines are processed.Do one process code at a time. For example, with the highlight on the top line, type O, ENTER, and F3. This will place the part on a manual special order.
Then highlight the next line and type B, ENTER, B, ENTER, B, ENTER, and then F3. This will start a PO for those 3 lines.
Close all lines to keep the status screen (above) clean.
Put a part on a PO
Press F7 to search for a vendor.Selecting a vendor before beginning the B or BN process saves it in memory for the PO.
 The vendor's phone# is displayed.
Select the vendor and press ENTER to put it into memory for the PO.
 Press B to put this part on a PO, or BN to put the part on a PO and move it to a new invoice.
 Enter the necessary information and press F3
 The program prompts for the price, defaulted at cost. You can accept the default, or type in an amount, or C and a percentage to calculate cost plus.
 Enter a preset (PIKM) PO printer number, or N if you do not want it to print.